Welcome to the world of data analytics! As a newcomer, you might have come across Google Analytics, one of the most user-friendly analytics tools available. It’s designed to help business owners understand their website’s performance, although getting started and setting it up can seem overwhelming. Don’t worry—this guide will lay the groundwork for you to effectively use Google Analytics.
Prepare for a straightforward journey into grasping your website’s performance data.
What is Google Analytics?
Google Analytics is a free analytics platform that allows marketers to track how visitors discover their website through various channels such as organic search, paid search, and social media. It provides valuable insights like real-time traffic analysis, landing page performance, and conversion metrics.
Unlike Google Search Console, which focuses primarily on search engines, Google Analytics offers comprehensive performance data across all traffic sources.
Universal Analytics vs. Google Analytics 4
Universal Analytics (UA), the previous version of Google Analytics launched in 2012, was well-known for its ability to deliver detailed analytics on page performance and user journeys.
The latest version, Google Analytics 4 (GA4), shifts to tracking user interactions as "hits" or "events," providing deeper insights into user behavior, including page views and specific actions taken.
The transition from Universal Analytics to GA4 has introduced significant changes in data collection, account organization, and event tracking, leading to some controversy and prompting the rise of Google Analytics alternatives like PostHog.
Getting Started with Google Analytics
To access the valuable reporting features of GA4, you first need to sign up for a Google account and install the tracking code. Without this code, Google won’t be able to collect data about your users.
Begin by logging into Google Analytics with your Google account.
If this is your first time signing in, you’ll be directed to a welcome screen.

Click on Start measuring to get the setup process started.
Creating Your Google Analytics Account
The setup process begins with naming your account.

Remember, you can select any name you like for your property, but keep in mind that it will be visible to anyone you later grant access to your Analytics account. For clarity and ease, it's often best to use a straightforward name such as your business or website name.
Set Up Your GA4 Property
A Google Analytics account serves as the top-level container for properties, with each property configured to track a specific website.
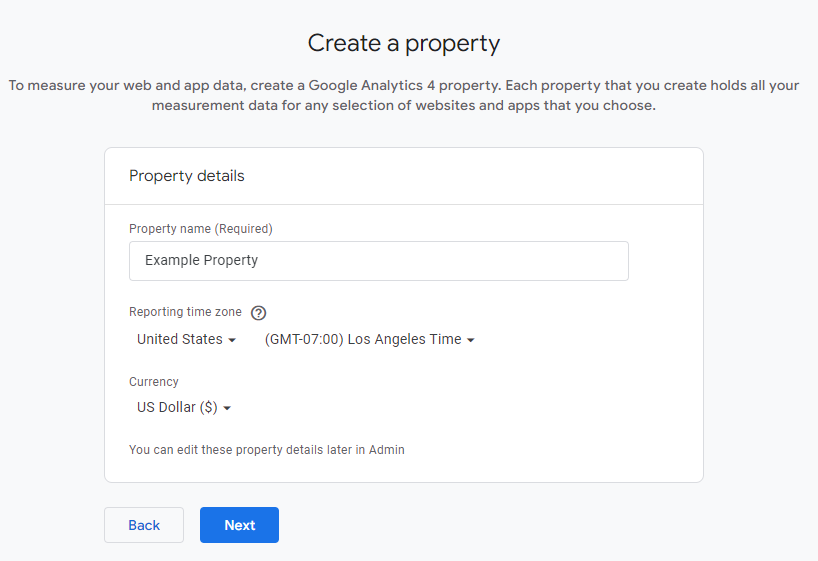
The next step is to name your property, typically using the name of your website. After naming it, select your location, time zone, and currency, then click "Next" to proceed.

Enter Your Business Information
Next, Google will prompt you to provide some basic details about your business. You'll need to specify your industry category; if none of the options closely match your business, choose "Other Business Activity." Then, indicate the size of your business and click "Next" to continue.

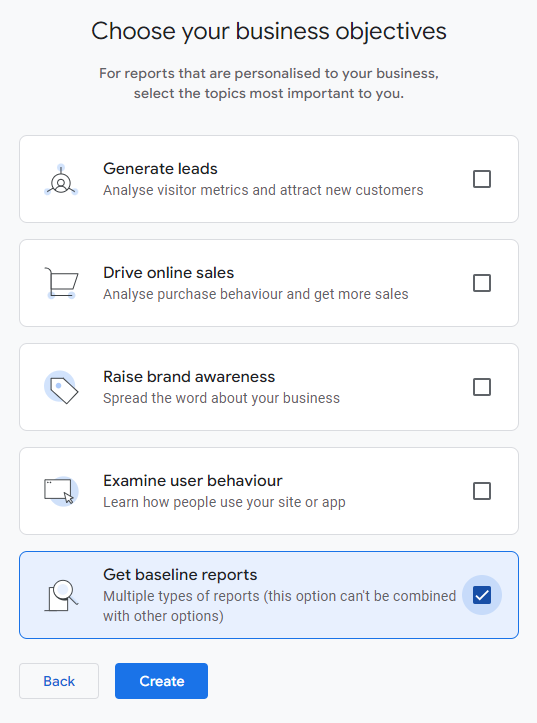
Select Your Business Objectives
The options you select here will influence the default reports configured in your Google Analytics dashboard. If you're unsure about which objectives to track, select "Get baseline reports" to start with a standard set of reports. Remember, you can update your business objectives at any time, so there's no need to worry too much about this step.

Configure a Data Stream
With your account ready, it’s time to begin data collection by configuring a data stream. This process establishes the connection that sends data to your Google Analytics property.
For tracking website performance with GA4, select the "Web" option.

Here, enter your website URL, give your Data Stream a name, and ensure that Enhanced Measurement is enabled.

Installing Google Analytics

You have three options for installing Google Analytics:
- Manually add the tracking code to your website.
- Use a plugin or integration to install the tracking code.
- Install the tracking code via Google Tag Manager.
In this guide, we’ll cover how to install it manually.
Installing GA4 Manually
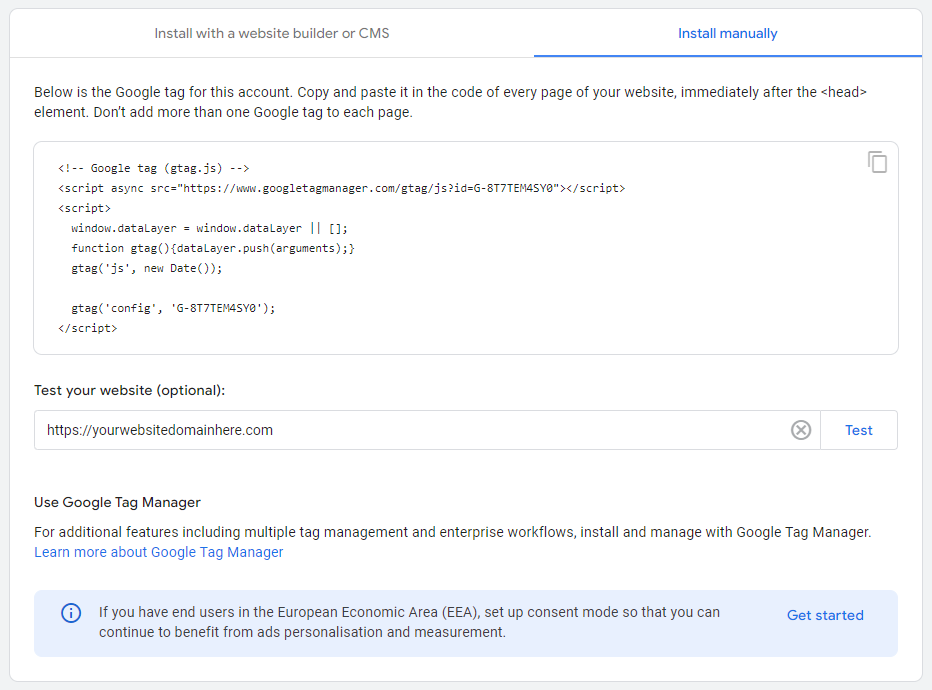
Start by clicking on "View tag instructions."
Then, select the "Install manually" tab to access the tracking code needed for GA4 installation. Click the Copy icon to copy the tracking code to your clipboard.

Next, go to your website and insert the tracking code at the beginning of the <head> section.
It's crucial to place the code in this location for the tag to function correctly. Incorrect placement might result in inaccurate user measurements.
If you're uncomfortable modifying your website’s code, we recommend getting help from a developer.
Alternatively, you can use WordPress plugins like Google Site Kit or Tracking Code Manager to install GA4 without needing coding skills.
Once this step is done, you'll be set to start tracking data with Google Analytics!
Navigating the Google Analytics Dashboard
Real-Time Reporting
To view real-time data, go to the Reports section in the left-hand menu and click on "Real-time."
Real-time reporting lets you see how users are interacting with your site right now, enabling you to make immediate adjustments and optimizations to enhance user experience, increase conversions, and improve overall performance. This feature is particularly useful for monitoring content marketing campaigns and paid advertising efforts.

User Acquisition
In the Reports menu, navigate to the Business Objectives section, select “Generate leads,” and then choose “User acquisition.”
This report provides a detailed breakdown of the various sources of traffic to your website. For instance, if you ran a major Meta (Facebook and Instagram) ad campaign, you would likely see Paid Social as the primary traffic source in the report.

Landing Pages
For a more detailed view, the landing pages report provides insights into which pages users visit first when they land on your website. To access this report, navigate to Life Cycle, then Engagement, and select "Landing Pages."

Analytics Intelligence
Google Analytics offers built-in AI insights to help you understand your data better. To use Analytics Intelligence, click on the search bar at the top of the page, and it will suggest common questions related to your business objectives.

Click on “More suggestions” to open the Analytics Intelligence menu, where you can explore insights about virtually every aspect of your website visitors.

Key Takeaways
Setting up Google Analytics is essential for monitoring your website or brand's growth online. It provides valuable insights into your audience, tracks marketing performance, and supports informed decision-making to enhance your online presence.
- Google has retired Universal Analytics in favor of Google Analytics 4 (GA4).
- Setting up GA4 is straightforward: simply log in with a Google account and install the tracking code.
- Google Analytics offers both historical and real-time data on your website visitors.
- GA4 integrates AI analytics, enabling you to query your data effectively.
Once your setup is complete and data is being tracked, it’s time to focus on your content marketing strategies.
Sign up for Ai-Wordsmith today to harness the power of AI in your content strategy! With Jasper, you can streamline content creation, analyze existing material, and optimize your campaigns for improved engagement.